Consuming a Rails API using Alamofire
May 25, 2017
Making network requests in today's world is a requirement to be successful in the App Store. You might be familiar with the Apple API NSUrlSession or the Swift version UrlSession to make those requests. They get the job done but other libraries have boldly come forward to make the task easier such as Alamofire. I'll be using Alamofire to show you how to make a request and validate that we got the response we wanted.
If you haven't been following along you can start here where I show you how to make a Rails API from scratch. Alternatively, you can just download the Rails API from the Github link I have below Downloads.
Downloads
If you're gonna follow along with this project you'll need a few things.
When you download and run the Swift project it should run without any errors if you're using Xcode 8.2. The Swift simulator should be a blank UITableView.
The Rails API should also start right out of the box. Go navigate through the terminal and seed the project before running it to make sure there will be data to display for later.
bin/rails db:seedThis will populate the database. You can then run the server if you'd like.
bin/rails sIf everything compiles correctly then you're set so keep following along!
Installing Alamofire
The first thing we need to do is install the Alamofire networking library using cocoaPods. If you're unfamiliar with what that is then you can learn about it on their website cocoapods.org.
The following instructions will assume you have cocoaPods installed on your computer.
To install the library you'll need to use the terminal and go to the root directory of the Swift project. Once inside the project type this into the terminal.
pod installHit enter. Your terminal should look like this when it's done running.

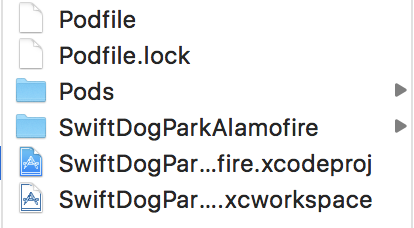
To continue along we'll follow the instructions in the terminal and close our current project then open the .xcworkspace project that was just created for us. Your folder structure should look like this. You'll see both projects but the one we want to use now is the .xcworkspace project.
Go ahead and run the project to make sure it compiles and looks the same as it did before. You shouldn't have any issues. Once you've done that close the simulator and open up the DogPark.swift file so we can pick up there with constructing the model for the dog parks.
Creating the Dog Park Model
Our DogPark.swift file right now is pretty plain as it stands. We'll be using a struct to model the dog park objects since we don't need inheritance and we get value semantics this way. I'll be giving my model the responsibility of using JSON to initialize its variables. Since JSON is error prone we'll create a failable initializer to handle any cases when we can't find the data we need to create the DogPark object.
init?(json: [String:Any]) {
    guard let name = json["name"] as? String else {
      return nil
    }
    self.name = name
}
Our initializer above takes in a dictionary called json as a parameter. The guard statement is used to look for a value with the key "name" and if it doesn't find it then we return nil otherwise we assign the value to our struct property name. This works well for a single guard statement but what if we needed dozens of values from the json dictionary. We'll refactor the code to be a little more descriptive when handling errors by using a throwing initializer instead.
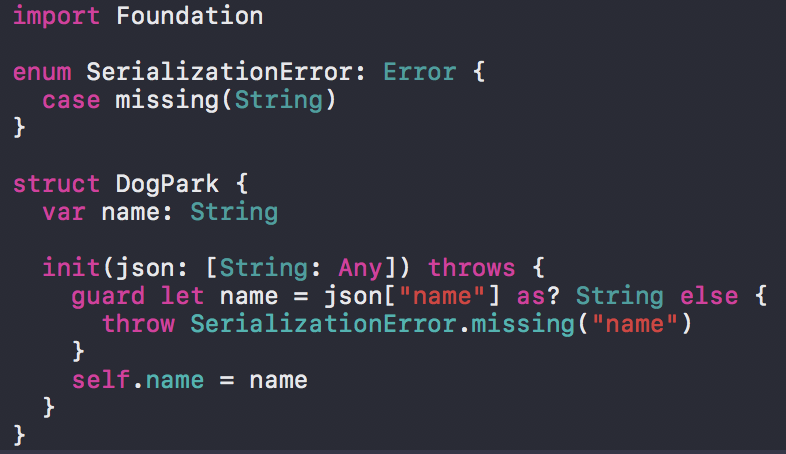
// [1]
enum SerializationError: Error {
  case missing(String)
}

struct DogPark {
  var name: String

  // [2]
  init(json: [String: Any]) throws {
    guard let name = json["name"] as? String else {
      // [3]
      throw SerializationError.missing("name")
    }
    self.name = name
  }
}
- This is an enumeration that adopts the Error protocol. SerializationError can now represent an error that can that can be thrown. Below it I created a case called missing(String) that uses an associated value. We can use the associated value to indicate specifically which key was missing when we use it to throw an error as you can see farther down in the code.
- I removed the "?" and added the throws keyword. This changed our initializer from a failable initializer to a throwing initializer. A throwing initializer forces the caller to handle errors by using a do-catch statement.
- Inside of our guard statement we use the throw keyword to end initialization and throw an error because our guard statement failed. We also included the string "name" so that if this error occurs it'll print out for us giving a better insight into the issue.
I prefer using Error types over nil when it makes sense because it gives me better info about errors in my code. Either will get the job done so it's purely up to you.
That'll do it for our DogPark.swift file. All we need to do is hand our DogPark struct a piece of JSON to create new instances of a DogPark and it'll safely handle the rest. We'll next look at how to use Alamofire to grab data from our API.
Here's what my file looks like.
Using Alamofire
Open your Search.swift file and below the import Foundation statement, add import Alamofire so that we have access to it. Build your project by pressing ⌘ + B and if you had any errors they should disappear.
If this didn't work you should check that you're working inside the .xcworkspace project and not the original project.
Creating our Get Function
Inside our search class, we need a single function that will get all the instances of a dog park from our Rails API and return them. To begin I'll start by creating a static function called requestAllDogParks with no parameters.
class Search {

  static func requestAllDogParks() {
    // code
  }

}
That's the function we'll call when we want to make a request to our API. Now we need to utilize Alamofire to actually contact the API and request some results. Luckily we've got a handy static function on Alamofire called request that will do just that. Inside our function type in the following code.
Alamofire.request(" ", method: .get, headers: ["":""])
This is the basic layout for our request. The first parameter is the URL endpoint we want to handle our request. The method argument . get is used to indicate the type of HTTP method. Lastly, we have a headers argument that's a dictionary (we'll be using it to pass our authentication token later). When you type that in you'll get a warning that says Result of call is unused, but produces 'DataRequest' meaning that we're not doing anything with the data we expect back. Type in the following.
Alamofire.request(" ", method: .get, headers: ["":""])
      .validate(statusCode: 200..<300) // Validates that we got valid response from the server
      .responseJSON() { response in // Here is the response we received back
}
To handle the response we chained on two methods to our request. The .validate is called before we handle the response to verify the request was successfully completed by the server. If the statusCode isn't between 200 and 300 then an error is generated. The second method .responseJSON validates that the response we received back is sent in JSON format and if not then an error is generated. Alamofire makes it easy to avoid common problems with methods like these. Next, we'll add the URL and create our headers dictionary.
let headers = [
      "Authorization":"Token token=5f93476d86b171df78e093b222420bd7",
      ]

    Alamofire.request("http://localhost:3000/api/v1/dog_parks", method: .get, headers: headers)
      .validate(statusCode: 200..<300)
      .responseJSON() { response in
        print(response)
      }
That'll do it. We can now make our request! Just remember that your authentication token is probably different than mine so you'll need to find that and use it instead. If you need help generating the token or finding it just visit my post Rails Token Authentication and you'll find instructions on how to do that.
The last thing we need to do is call .requestAllDogParks() at the bottom of ViewDidLoad inside of DogParkViewController.swift. Placing it in there will make sure it's called every time we run the app.
Search.requestAllDogParks()
Run the app! Wait... Bam! Error! You should see something along the lines of "App Transport Security has blocked a cleartext HTTP..." This means we're making a request that isn't secure and Apple guards against that. This makes sense but since we don't use encryption for this we'll be skirting this protective measure from Apple for testing purposes.
Go into your info.plist file. We need to add something very minor so that our request will be allowed through. Right click inside the plist and click Add Row. On the new row start typing "App Transport Security Settings" and it should autofill before you finish. Expand that new row and then click Add Row again and you should see a dropdown of options for the row and pick "Allow Arbitrary Loads" and change the value to YES. If you followed that then your new addition to info.plist should look like mine.

Remember to start your Rails API by using the "bin/rails s" command in the terminal
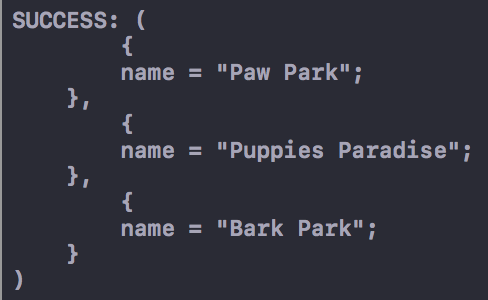
Run the app again and you should have some nicer console output this time. If you seeded the database then your Xcode console should look like this.
We've successfully contacted the database and gotten back the results we wanted. We need to figure out how to turn those into objects for our app. That comes next!
We can make one more optional refactor to our request method. The default HTTP method is GET when we make a request using Alamofire so we can remove that. Inside the .validate method, we added an argument to only accept status codes between 200 and 300 but by default that's what it uses.
Alamofire.request("http://localhost:3000/api/v1/dog_parks", headers: headers) // GET is the default HTTP method
  .validate() // Default statusCode validation is 200..<300
  .responseJSON() { response in
    print(response)
  }
If you refactor and run your code you should get the same result. The default behavior can really shorten our code but it's always nice to know how to change the defaults. Let's move on.
Handling Our Data
To complete the Search.swift file we need to...
- Check for Errors in the Response.
- Parse the Data to initialize DogPark instances.
- Hand over the results to our view.
Checking for Errors
Inside of our .responseJSON() closure we get a response but that doesn't mean that it contains the information we want. To check for any errors you use the dot operator to first get the result and then the error. The error is an optional so if it's nil we know there weren't any issues and we can assume our HTTP request was successful. You can see I used an if-else statement to check for the possibility of an error.
After checking for errors I use an if-let statement to check the response.result.value for nil and then assign it to values if it's not nil. It's just another security measure to make sure I'll be parsing valid values and handing them to my DogPark initializer later.
Alamofire.request("http://localhost:3000/api/v1/dog_parks", headers: headers) // GET is the default HTTP method
    .validate() // Default statusCode validation is 200..<300
    .responseJSON() { response in

      // *** Error Check Code ***
      if (response.result.error == nil) {
        debugPrint("HTTP Response Body: \(response.data)")
        if let values = response.result.value {
          // Use values to initialize DogPark instances
        }

      }
      else {
        debugPrint("HTTP Request failed: \(response.result.error)")
      }
      // *** End of If-Else statement ***
    }
The code is inside of the .responseJSON closure. If our request fails for any reason now it'll be printed to the console with the prefix "HTTP Request failed: " and a description of the error.
Parse the Data
Before we start parsing the data I think we need a place to hold the results when we're done. To hold the final results we'll add a variable at the top called dogParks that is an array of DogPark instances and initialize it as an empty array.
static func requestAllDogParks() {
    var dogParks: [DogPark] = [] // Add this code to your function

    // Alamo Request is down here
}
That will give us a place to store the results of the parse function we're about to add. Inside the if-let statement, we'll go ahead and set the new dogParks variable to the function we're about to create. We'll do that in there because we have the variable values that we'll be passing in as an argument. You can copy and paste the code below.
// Alamofire.request...

if (response.result.error == nil) {
  debugPrint("HTTP Response Body: \(response.data)")
  if let values = response.result.value {
     dogParks = self.parse(values: values) // Add this line of code
  }
} // else ...
This should give you an error because the function parse doesn't exist yet. We'll add that next. The purpose of that function will be to create chunks of JSON from our data to initialize instances of the DogPark struct. Include the following code inside of the Search class as it's own static function.
// Takes in the HTTP response data and returns a DogPark Array
  static func parse(values: Any) -> [DogPark] {
    var dogParks: [DogPark] = []

    // Attempting to cast the values property into an Array of Any
    guard let values = values as? [Any] else { return dogParks }

    // Evaluate each value from the values Any Array
    for value in values {
      //Cast the value from the values Array to a Dictionary
      if let resultDict = value as? [String: Any] {

        // Attempt to initialize an instance of DogPark with the dictionary
        do {
          let dogPark = try DogPark(json: resultDict)
          // If try is successful we'll append the results and continue as normal
          dogParks.append(dogPark)
        } catch {
          print("ERROR: \(error)")
        }

      }
    }

    // Returns an instance of DogPark Array
    return dogParks
  }
When you read through the code you'll see it's all just meant to drill down into the data to grab the pieces of JSON we need to initialize DogPark instances. First, the data is cast to an array of Any and then to individual values that are dictionaries. This process will vary depending on what the root of the JSON is but our API gives us an array with dictionary values so that's what we use.
To initialize an instance of DogPark you'll notice we use a do-catch statement because we made the initializer a throwing initializer. If it works we go about our normal business and if not we can handle the problem inside our catch statement.
Using the Results in our View
This is the last ingredient we need to add. We've got an array of DogPark instances but how do we give those to our view to show? I believe the best way to do this would be to use a callback to the requestAllDogParks function. We'll add a typealias to represent the callback at the top just below the import statements.
typealias SearchComplete = (_ isSuccessful: Bool, _ dogParks: [DogPark]) -> Void
The typealias will contain a property to indicate if we successfully returned DogPark responses or alternatively to indicate that it failed. The second property will be the array of DogPark instances. Next, we'll edit the requestAllDogParks function signature by adding the property to enable a call back like this.
static func requestAllDogParks(completion: @escaping SearchComplete )
The part you might find interesting is the @escaping prefix before the closure. This is required because our closure might need to be around after requestAllDogParks has finished running. You can find a more thorough explanation in Apples documentation here. The last thing we need to do is call the completion when we've got a completed Array of dogParks after the parse function or when it fails.
if (response.result.error == nil) {
  debugPrint("HTTP Response Body: \(response.data)")
  if let values = response.result.value {
    dogParks = self.parse(values: values)
    completion(true, dogParks) // *** The request worked and we pass back the parsed results ***
  }
}
else {
  debugPrint("HTTP Request failed: \(response.result.error)")
  completion(false, dogParks) // *** The request failed ***
}
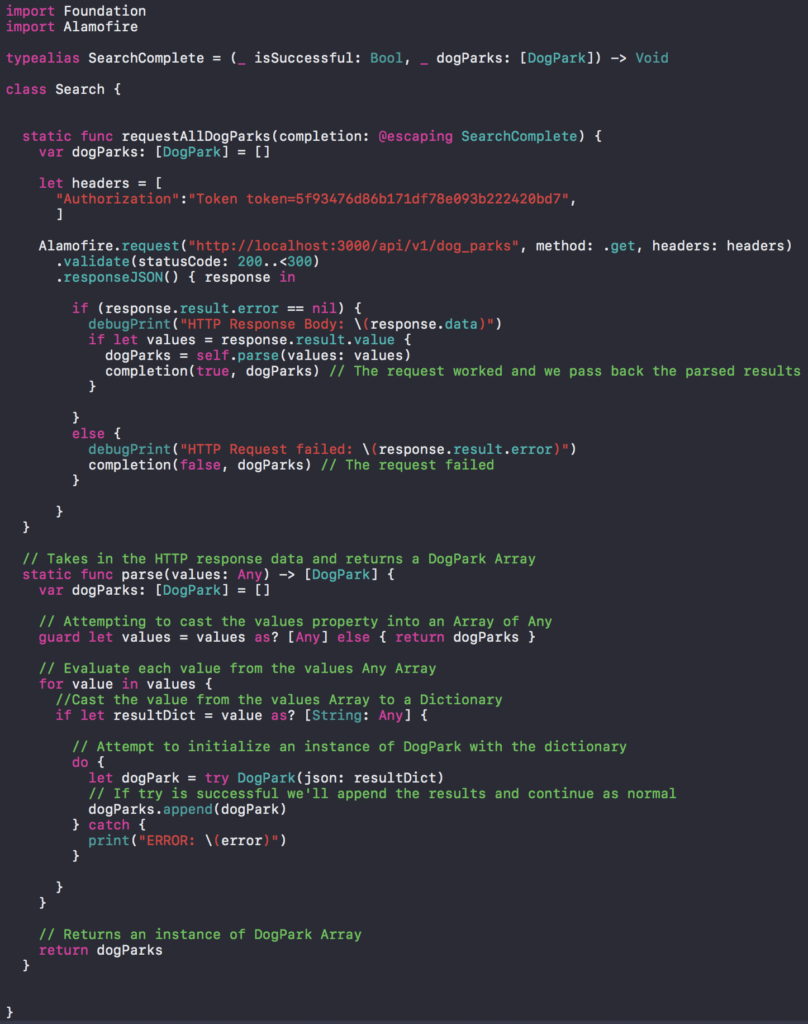
That's all we need to do inside of Search.swift. Your file should look like this.
All we have left to do is jump into DogParkViewController.swift and update the function call.
Rendering Our Results
Inside of your DogParkViewController.swift file, you should be getting an error. That's because we added a parameter to requestAllDogParks() and haven't updated it yet. We'll add on a closure to handle the new parameter since the completion variable is a function.
Search.requestAllDogParks() { isSuccessful, dogParks in
  // Check isSuccessful in here
}
The completion parameter took a Bool and array of DogPark so here we've assigned those variables to isSuccessful and dogparks. The last thing we wanna do is check the isSuccessful parameter for true or false and then assign our local dogParks array to the result dogParks from our requestAllDogParks function.
Search.requestAllDogParks() { isSuccessful, dogParks in
  if isSuccessful {
    self.dogParks = dogParks
  } else {
    // Let the user know the request failed
  }
}
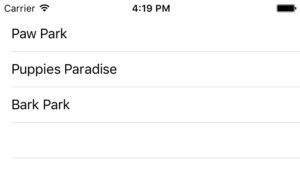
Because of the isSuccessful parameter, we have the chance to let the user know that the request failed. In applications, it's important to let users know when something didn't work. Ideally, we'd give them a specific reason why and tell them how to fix it possibly or if they even can. We then assign our local instance of dogParks to the result dogParks and our viewController handles the rest. Run the code and you should see these results in the simulator.
You DogParkViewController.swift file should look like this.

That's it! I hope it all worked well for you and was easy to follow. If you have suggestions please leave a comment or reach out to me on twitter @josh_qn. I'm always trying to improve so let me know if anything was confusing or not clear.
If you'd like to see the final project you can find it here at Github.
Thanks again! Auf wiedersehen!